How to Identify the Most Visited Web Pages
This step-by-step guide helps GTM teams leverage website behavior data for personalized engagement.

Principal GTM Expert, Marketing Operations
-
Journey Stage
All Stages
-
Team
RevOps
-
Expertise Level
Intermediate, Expert
Contents
Partner with Demandbase Experts
Get tailored strategies and insights to optimize your approach, drive engagement, and unlock new opportunities.
What you’ll learn
This playbook provides a clear, step-by-step guide to identifying the top three most visited web pages by accounts or individual people within a customizable time period. By the end of this playbook, you will know how to use Demandbase to create a calculated field that surfaces these meaningful insights, allowing your go-to-market (GTM) teams to take informed action based on website behavior data.
Key Takeaways:
- How to configure and use a calculated field in Demandbase that presents the top three visited pages in a time frame.
- How to track and analyze both anonymous and known website visits.
- How to exclude irrelevant web pages (e.g., Careers, Unsubscribe) from your analysis.
- How this data can be effectively utilized in your CRM, reports, and automations to drive alignment and efficiency within your organization.
Why is this important?
Understanding which web pages your customers and prospects visit most is critical to tailoring marketing and sales strategies. Unfortunately, traditional tools struggle to provide actionable summaries, requiring significant manual effort to connect the dots.
Demandbase automates this process, translating raw website activity into insights that help you pinpoint the areas of your site most relevant to each Account or person. This data empowers your teams to focus on key areas of interest, make timely decisions, and turn insights into action without the guesswork.
Imagine knowing, at a glance, where a high-value client spends their time on your website. With this information, you can deliver tailored follow-ups, adjust your pitches, identify engagement trends or create campaigns that resonate at the right moment.
What you need to get started
To implement this playbook, ensure you have the following in place:
Technology:
- Demandbase Script deployed on your website.
- Custom Field in your CRM for Accounts and/or Leads/Contacts (optional, but highly recommended for highlighting these insights in CRM Reports and Page Layouts)
- Integrated Marketing Automation Platform (MAP) (optional but highly recommended for tracking Known Visits).
Pre-requisites:
- A list of web pages to exclude from analysis (e.g., Careers, Unsubscribe).
- CRM access with appropriate permissions for custom fields and configurations.
Keep reading for a detailed breakdown of each step involved in setting this up.
Step-by-step playbook
Part 1: Setting the stage
Step 1. Build your exclusion list
Before you analyze website visitors’ activity, it’s important to determine which web pages to exclude from your analysis. Pages such as Careers, Sitemap, or Unsubscribe pages, which typically don’t provide meaningful insights, should be removed.
Action Items:
- Compile a list of irrelevant or low-value pages.
- Keep this list handy, as you’ll use it to define criteria in the next steps.
Step 2. Confirm your technology setup
To ensure successful tracking at both the Anonymous and Known visitor levels, confirm that the following technical requirements are met:
- Demandbase Script deployed on your website: Enables tracking of anonymous visitors by Account
- Marketing Automation Platform (MAP) Integration (e.g., Marketo, HubSpot): Tracks known visitors by syncing their activity with their corresponding Account/Person data.
Pro Tip: If your MAP is not integrated, you can still proceed, but only anonymous visit data will be tracked.
Step 3. Create a custom CRM field
This step depends on whether you want to map the data back to your CRM. While this integration isn’t technically required, it’s highly recommended for broader utility.
Steps to configure:
- Create custom fields in your CRM for Accounts and/or People (Leads/Contacts).
- If syncing data to your CRM, ensure the custom field has a clear label (e.g., “Top 3 Web Pages”).
Part 2: Creating a Calculated Field in Demandbase
Step 1. Navigate to Demandbase Calculated Fields (DBCF)
Go to DB1M Settings and locate the Demandbase Calculated Fields section.
Select “+ Create New” to start building your new Calculated Field.
Step 2. Define your data type and field label
- Data Type: Choose Top Occurring Activities.
- Top Occurring Type: Select Page URLs.
- Field Label: Name your new field something intuitive (e.g., “Top 3 Visited Pages (1 month)”). If this field will sync with your CRM, ensure the label here matches the CRM custom field name.
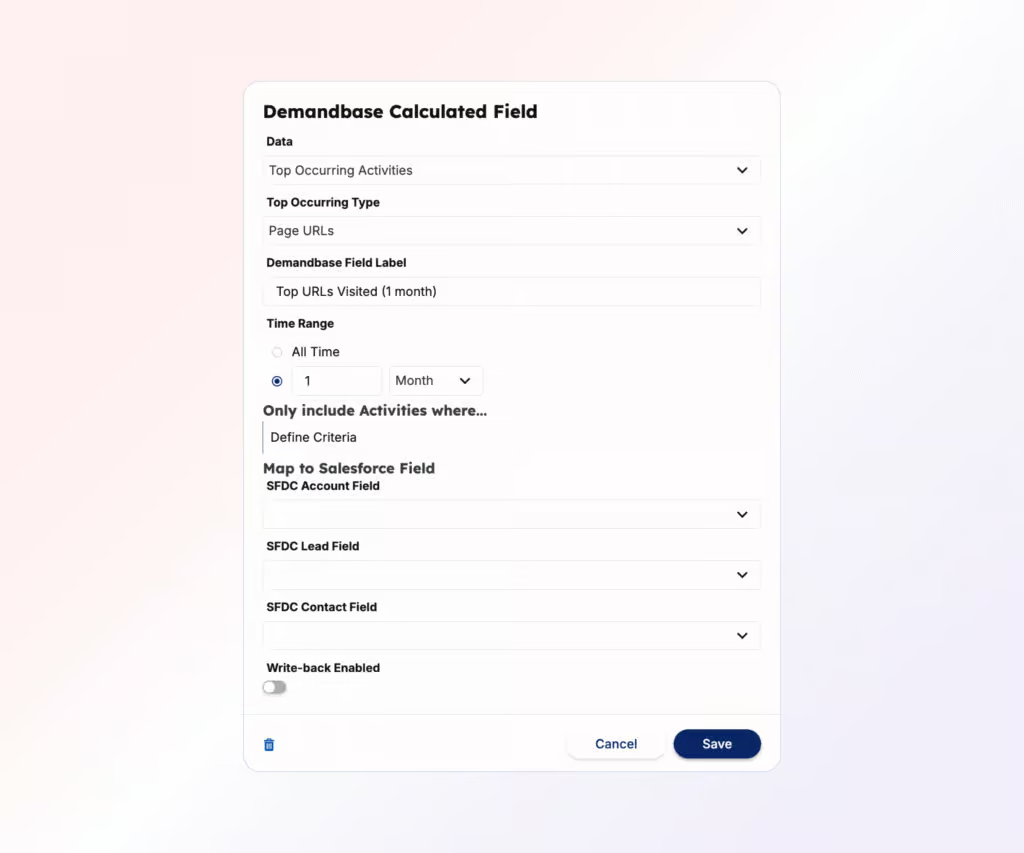
Step 3. Set the time period
Determine the time period for your analysis.
- Typical time ranges are 1 month and 3 months for actionable insights.
- Select your preferred duration in the Time Range section.
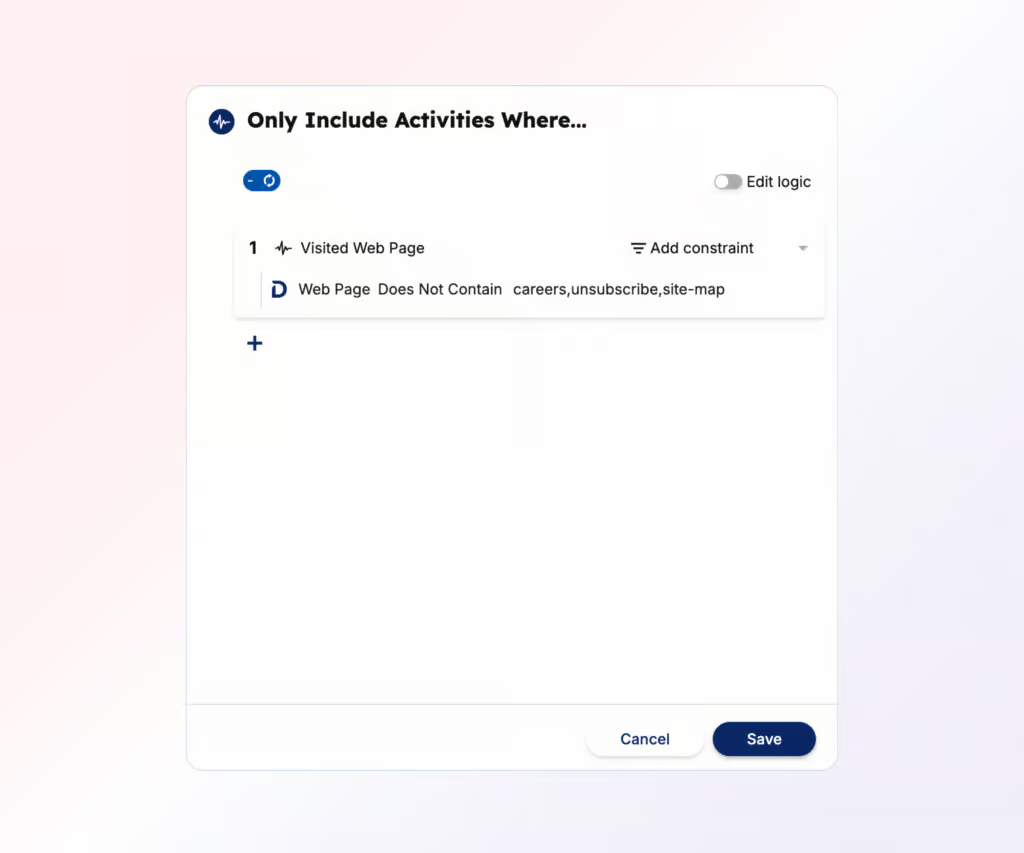
Step 4. Define criteria
- From the Calculated Field configuration screen, click Define Criteria under “Only include Activities when…”
- Add an Activity filter for Visited Web Page.
- Exclude irrelevant pages using the exclusion list you compiled earlier:
- Set “Web Page Does Not Equal” or “Web Page Does Not Contain” to remove Careers, Sitemap, and Unsubscribe pages.
- Remove unnecessary constraints like Activity Date (already set by your Time Range).
- Under the “Add Constraints” area on the activity card, you can select “Source”. Without selecting this, you will automatically find both Anonymous and Known Web Page Visits. If you wish to choose Anonymous only, set Source = “Demandbase”. If you wish to choose Known only, set Source = “Name of your Marketing Automation Platform”.
- Save your criteria to return to the main screen.
Part 3: Finalizing and mapping
Step 1. Save and map the field (optional)
- If you plan to use this field exclusively within Demandbase, you can skip this step.
- To sync with your CRM, locate the dropdown menus for Account and People objects in Demandbase.
- Remember, for Accounts, this field will look at all web visits within the Account, while the People field will be specific to one individual.
- Select the custom CRM field you created earlier and toggle “Write-back Enabled” to blue.

Step 2. Save the field
Once you’ve configured and mapped everything, click Save to finalize your new Calculated Field.
Part 4: Putting insights to use
Step 1. Populate CRM layouts
Add the new “Top 3 Visited Pages (1 month)” field to your CRM layouts.
- For Accounts, Leads, or Contacts, ensure the field is visible and easily accessible to your teams.
Step 2. Build reports and alerts
- Reports
- Add the newly created field to MQA, MQL, and other pipeline-related reports.
- Highlight which web pages are most visited by high-value Accounts.
- Add to existing reports for Customer Success to highlight where Customers are spending their time on your website.
- Slack Alerts
- Create engagement alerts for recently engaged Accounts, focusing on their top 3 most visited pages in the last month.
Step 3. Use predictive insights
Leverage your Calculated Field for orchestrated plays like:
- Personalizing follow-up emails based on the content of top pages.
- Creating targeted ads or nurturing campaigns aligned with their website activity.
Step 4. Next level insights
You can always customize this field to be specific to things like a product, for example, “Top 3 Product A Visited Page (1 month)”
- Use this product-specific field to garner in-depth insights around product engagement for both prospects and customers.
The results
By implementing this playbook, your team gains critical insights that can transform the way you engage with prospects and customers. Here’s what you can expect to achieve with this strategy:
- Enhanced visibility: Instantly identify the most relevant parts of your website for any Account or Person, empowering your team with actionable insights.
- Personalized engagement: Equip your GTM teams to deliver highly relevant communications tailored to individual website behavior.
- Operational efficiency: Reduce reliance on manual processes by automating the aggregation of top-visited web pages directly in Demandbase and your CRM.
- Stronger alignment: Marketing, Sales, and Customer Success teams can coordinate efforts around shared insights, leading to improved outcomes across pipelines.
- Scalable insights: Use trends from top-visited pages across Accounts to identify broader audience preferences and improve content strategies.
These results are not just hypothetical. They represent the tangible improvements teams can realize when they integrate this approach into their workflows. Better decisions, better alignment, and, ultimately, better outcomes await when you leverage the power of Demandbase insights.
Partner with Demandbase Experts
Get tailored strategies and insights to optimize your approach, drive engagement, and unlock new opportunities.
More Playbooks
Learn how to set up and customize Demandbase's predictive models - Qualification Score and Pipeline Predict - to prioritize accounts, align with your GTM strategy, and drive higher conversion rates.
Learn step-by-step how to create custom engagement minute counts using DemandbaseOne Marketing. Discover how to track product interest, streamline sales efforts, and enhance GTM strategies with actionable insights.
Account Journey Setup Best Practices
This comprehensive playbook guides you through Demandbase Account Journey setup to align Sales, Marketing, and CS teams with unified metrics and account-focused stages.